Developer Guide
- Acknowledgements
- Setting up, getting started
- Design
- Implementation
- Documentation, logging, testing, configuration, dev-ops
- Appendix
Acknowledgements
- The original AB3 project, which Nursing Address Book (NAB) is based from.
- Libraries used: JavaFX, JUnit5, Jackson
Setting up, getting started
Refer to the guide Setting up and getting started.
Design
Architecture

The Architecture Diagram given above explains the high-level design of the App.
Given below is a quick overview of main components and how they interact with each other.
Main components of the architecture
Main (consisting of classes Main and MainApp is in charge of the app launch and shut down.
- At app launch, it initializes the other components in the correct sequence, and connects them up with each other.
- At shut down, it shuts down the other components and invokes cleanup methods where necessary.
The bulk of the app’s work is done by the following four components:
-
UI: The UI of the App. -
Logic: The command executor. -
Model: Holds the data of the App in memory. -
Storage: Reads data from, and writes data to, the hard disk.
Commons represents a collection of classes used by multiple other components.
How the architecture components interact with each other
The Sequence Diagram below shows how the components interact with each other for the scenario where the user issues the command delete 1.

Each of the four main components (also shown in the diagram above),
- defines its API in an
interfacewith the same name as the Component. - implements its functionality using a concrete
{Component Name}Managerclass (which follows the corresponding APIinterfacementioned in the previous point.
For example, the Logic component defines its API in the Logic.java interface and implements its functionality using
the LogicManager.java class which follows the Logic interface. Other components interact with a given component
through its interface rather than the concrete class (reason: to prevent outside component’s being coupled to the
implementation of a component), as illustrated in the (partial) class diagram below.

The sections below give more details of each component.
UI component
The API of this component is specified in Ui.java

The UI consists of a MainWindow that is made up of parts e.g.CommandBox, ResultDisplay, PersonListPanel, StatusBarFooter etc. All these, including the MainWindow, inherit from the abstract UiPart class which captures the commonalities between classes that represent parts of the visible GUI.
The UI component uses the JavaFx UI framework. The layout of these UI parts are defined in matching .fxml files that are in the src/main/resources/view folder. For example, the layout of the MainWindow is specified in MainWindow.fxml
The UI component,
- executes user commands using the
Logiccomponent. - listens for changes to
Modeldata so that the UI can be updated with the modified data. - keeps a reference to the
Logiccomponent, because theUIrelies on theLogicto execute commands. - depends on some classes in the
Modelcomponent, as it displaysPersonobject residing in theModel.
Logic component
API : Logic.java
Here’s a (partial) class diagram of the Logic component:

The sequence diagram below illustrates the interactions within the Logic component, taking execute("delete 1") API call as an example.

DeleteCommandParser should end at the destroy marker (X) but due to a limitation of PlantUML, the lifeline continues till the end of diagram.
How the Logic component works:
- When
Logicis called upon to execute a command, it is passed to anAddressBookParserobject which in turn creates a parser that matches the command (e.g.,DeleteCommandParser) and uses it to parse the command. - This results in a
Commandobject (more precisely, an object of one of its subclasses e.g.,DeleteCommand) which is executed by theLogicManager. - The command can communicate with the
Modelwhen it is executed (e.g. to delete a person).
Note that although this is shown as a single step in the diagram above (for simplicity), in the code it can take several interactions (between the command object and theModel) to achieve. - The result of the command execution is encapsulated as a
CommandResultobject which is returned back fromLogic.
Here are the other classes in Logic (omitted from the class diagram above) that are used for parsing a user command:

How the parsing works:
- When called upon to parse a user command, the
AddressBookParserclass creates anXYZCommandParser(XYZis a placeholder for the specific command name e.g.,AddCommandParser) which uses the other classes shown above to parse the user command and create aXYZCommandobject (e.g.,AddCommand) which theAddressBookParserreturns back as aCommandobject. - All
XYZCommandParserclasses (e.g.,AddCommandParser,DeleteCommandParser, …) inherit from theParserinterface so that they can be treated similarly where possible e.g, during testing.
Model component
API : Model.java

The Model component,
- stores the address book data i.e., all
Personobjects (which are contained in aUniquePersonListobject). - stores the currently ‘selected’
Personobjects (e.g., results of a search query) as a separate filtered list which is exposed to outsiders as an unmodifiableObservableList<Person>that can be ‘observed’ e.g. the UI can be bound to this list so that the UI automatically updates when the data in the list change. - stores a
UserPrefobject that represents the user’s preferences. This is exposed to the outside as aReadOnlyUserPrefobjects. - does not depend on any of the other three components (as the
Modelrepresents data entities of the domain, they should make sense on their own without depending on other components)
Storage component
API : Storage.java

The Storage component,
- can save both address book data and user preference data in JSON format, and read them back into corresponding objects.
- inherits from both
AddressBookStorageandUserPrefStorage, which means it can be treated as either one (if only the functionality of only one is needed). - depends on some classes in the
Modelcomponent (because theStoragecomponent’s job is to save/retrieve objects that belong to theModel)
Common classes
Classes used by multiple components are in the seedu.addressbook.commons package.
Implementation
This section outlines some notable details on how specific features are being implemented.
Adding a patient into NAB
Implementation
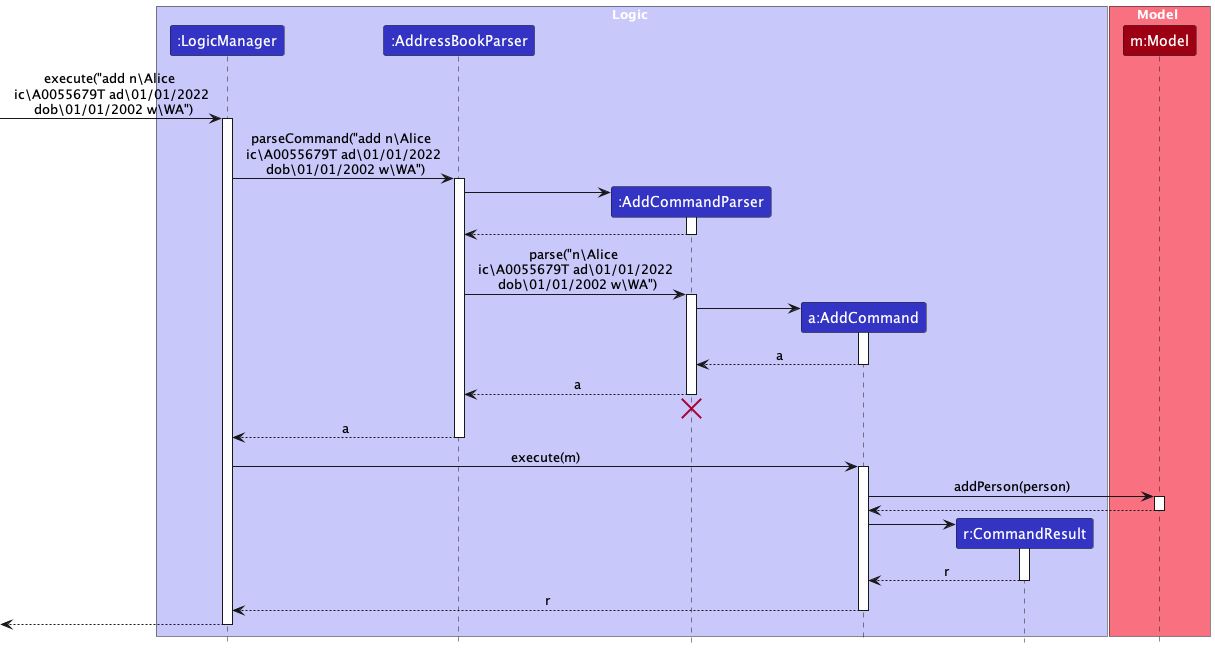
The add patient feature is facilitated mainly by AddCommand, AddCommandParser and LogicManager.
Given below is an example usage scenario and how the add patient feature behaves at each step.
Step 1. The user inputs an add Command (e.g. add n\Alice ic\A0055679T ad\01/01/2022 dob\01/01/2002 w\WA) to add a new patient named Alice to the address book.
- n\: Indicates the name of the patient
- ic\: Indicates the NRIC/FIN of the patient
- ad\: Indicates the admission date of the patient into the hospital
- dob\: Indicates the date of birth of the patient
- w\: Indicates the ward the patient is currently in
- r\: Indicates remarks for the patient (optional, can only have 1)
- t\: Indicates the tags of the patient (optional, can have multiple)
Step 2. LogicManager#execute(String) is called to execute the add command.
Step 3. The command is parsed via AddressBookParser#parseCommand(String), which calls AddCommandParser#parse(String) to parse the user input and creates a new AddCommand object.
Step 4. The created AddCommand is returned to LogicManager. Then, AddCommand is executed by calling AddCommand#execute(Model).
Step 5. The AddCommand#execute(Model) then calls Model#addPerson(Person) to add the new patient to the address book.
Step 6. The CommandResult from the AddCommand object is returned to LogicManager and then to UI to display the success message.
UML Diagrams:
The following sequence diagram summarizes what happens when a user executes a new command:
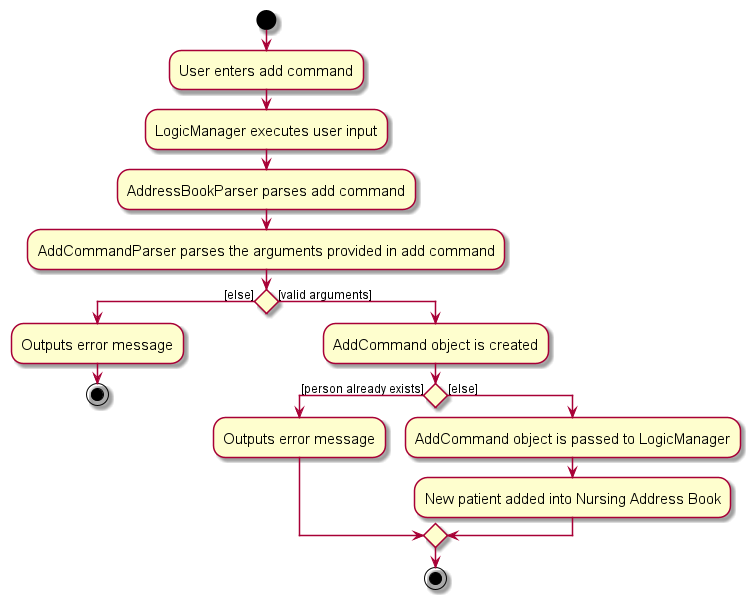
The following activity diagram summarizes what happens when a user executes a new command:
Deleting a patient from NAB
Implementation
The delete patient feature is facilitated mainly by DeleteCommand, DeleteCommandParser and LogicManager.
Given below is an example usage scenario and how the delete patient feature behaves at each step.
Step 1. The user inputs a delete Command (e.g. delete 1) to delete the patient at index 1 in NAB.
Step 2. LogicManager#execute(String) is called to execute the delete command.
Step 3. The command is parsed via AddressBookParser#parseCommand(String), which calls DeleteCommandParser#parse(String) to parse the user input and creates a new DeleteCommand object.
Step 4. The created DeleteCommand is returned to LogicManager. Then, DeleteCommand is executed by calling DeleteCommand#execute(Model).
Step 5. The DeleteCommand#execute(Model) then calls Model#deletePerson(Person) to delete the patient from the address book.
Step 6. The CommandResult from the DeleteCommand object is returned to LogicManager and then to UI to display the success message.
UML Diagrams:
Given below is the sequence diagram that summarizes what happens when a user executes a new command:

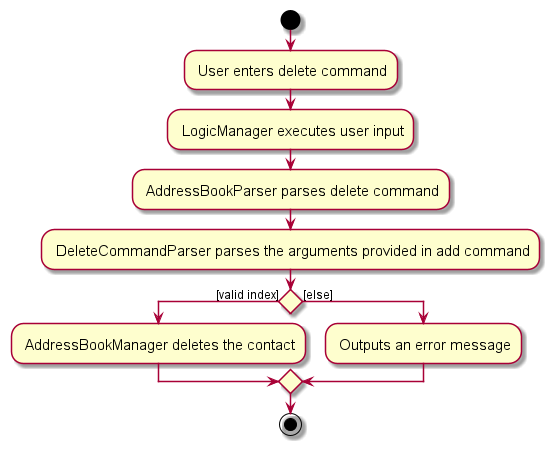
The following activity diagram summarizes what happens when a user executes a new command:
Editing a patient’s details
Implementation
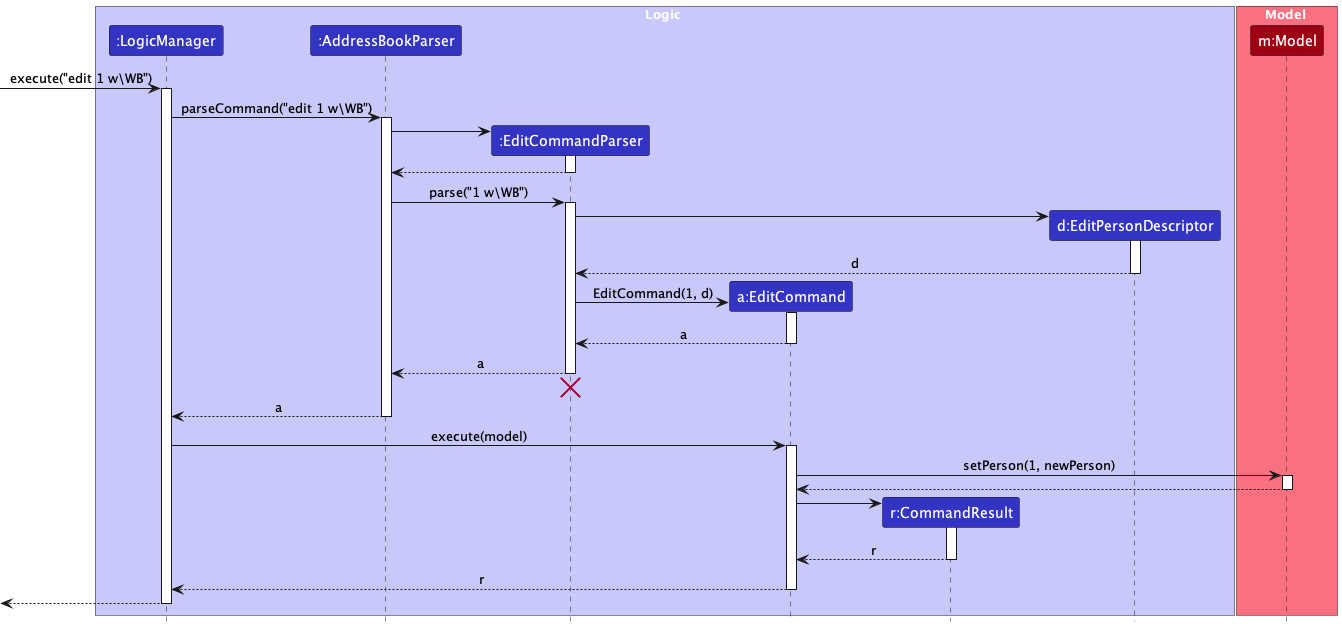
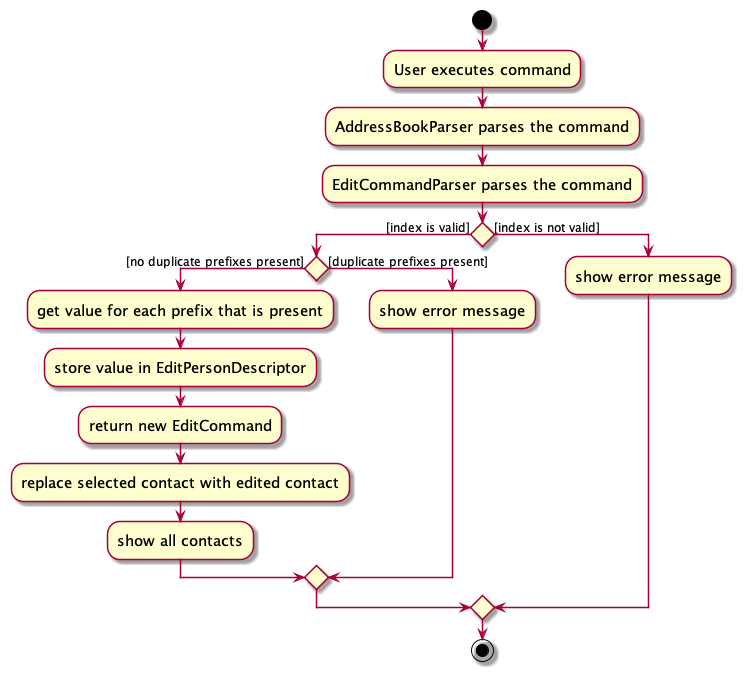
Editing a patient’s details is facilitated mainly by EditCommand, EditCommandParser and LogicManager.
Given below is an example usage scenario and how the edit patient feature behaves at each step.
Step 1. The user inputs an edit Command (e.g. edit 1 w\WB) to edit the ward of the patient at index 1 in NAB.
Step 2. LogicManager#execute(String) is called to execute the edit command.
Step 3. The command is parsed via AddressBookParser#parseCommand(String), which calls EditCommandParser#parse(String)to parse the user input and creates a new EditCommand object.
Step 4. A new EditPersonDescriptor object is created with the new ward details.
A new EditCommand instance will be created with the index of the patient to be edited and the new EditPersonDescriptor object.
Step 5. The EditCommand instance is returned to the LogicManager and execute is called.
Step 6. The EditCommand instance calls Model#setPerson(Person, Person) to edit the patient’s details.
The patient specified will have its ward updated to the new ward specified.
UML Diagrams:
The following sequence diagram summarizes what happens when a user executes an edit command:
The following activity diagram summarizes what happens when a user executes an edit command:
Showing help for commands
Implementation
Showing help for commands is facilitated by the HelpCommand class. It allows users to view the usage instructions for the application.
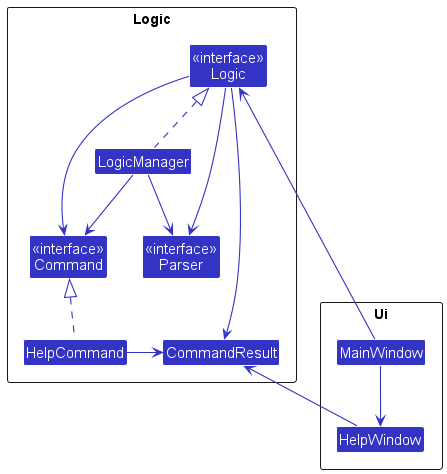
The HelpCommand class interacts with the following components:
-
Logic: TheHelpCommandclass is part of theLogiccomponent and is executed by theLogicManagerwhen the user enters thehelpcommand. -
UI: TheMainWindowclass in theUIcomponent subscribes to theCommandResultevent raised by theHelpCommandand displays the help message in theHelpWindow.
The HelpCommand class extends the Command interface and implements the execute() method. When the help command is executed, the HelpCommand#execute() method is called, which creates a CommandResult object with the help message to be displayed to the user.
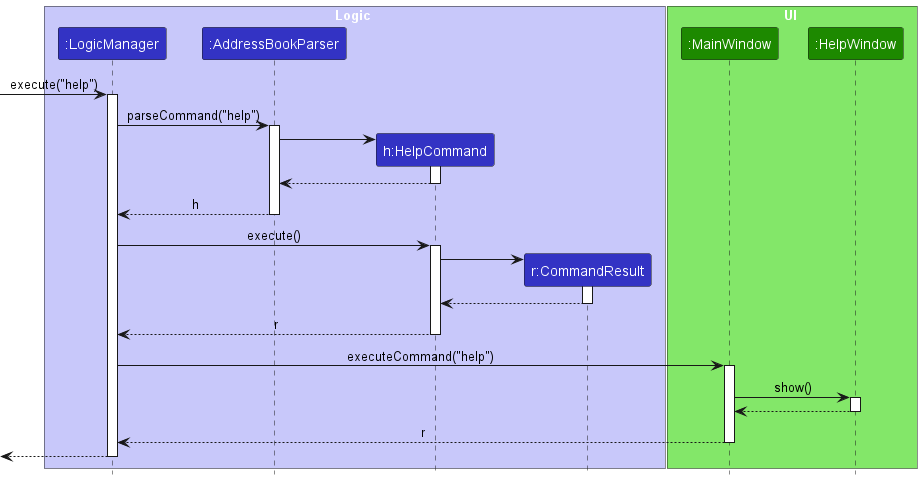
Here are the steps involved when a user calls the help command:
Step 1. The user enters the help command in the CLI.
Step 2. The LogicManager receives the command and calls the parseCommand() method of the AddressBookParser.
Step 3. The AddressBookParser identifies the command as a HelpCommand and creates a new instance of the HelpCommand class.
Step 4. The AddressBookParser returns the HelpCommand instance to the LogicManager.
Step 5. The LogicManager calls the execute() method of the HelpCommand instance.
Step 6. The HelpCommand#execute() method creates a new CommandResult object with the help message.
Step 7. The CommandResult object is returned to the LogicManager.
Step 8. The LogicManager passes the CommandResult to the MainWindow for display.
Step 9. The MainWindow extracts the help message from the CommandResult and displays it in the HelpWindow.
The following sequence diagram shows how the help command works:
Design considerations
Aspect: Displaying the help message
-
Alternative 1 (current choice): Display the help message in a separate window.
- Pros: Allows the user to view the help message without navigating away from the main window.
- Cons: Requires additional implementation to create and manage a separate help window.
-
Alternative 2: Display the help message in the main window’s result display.
- Pros: Simpler implementation, as it reuses the existing result display component.
- Cons: The help message may be obscured by subsequent command results, and the user may need to scroll to view the entire message.
Aspect: Providing command-specific help
-
Alternative 1 (current choice): Provide a general help message that covers all commands.
- Pros: Simplifies the implementation and maintains a consistent help message format.
- Cons: The user may need to read through the entire help message to find information about a specific command.
-
Alternative 2: Provide command-specific help messages.
- Pros: Allows users to quickly access help information for a particular command.
- Cons: Requires additional implementation to map each command to its specific help message, and may lead to inconsistencies in the help message format.
Future enhancements
Here are some possible enhancements for the help feature:
- Implement context-sensitive help that provides guidance based on the user’s current input or state.
- Add support for displaying rich media content, such as images or videos, to provide more engaging and informative help content.
- Integrate a search functionality within the help system to allow users to quickly find relevant information.
These enhancements would improve the user experience and make the help feature more interactive and user-friendly.
List by tags and/or ward feature
Implementation
The filter by tags and/or ward mechanism is facilitated by ListCommand, ListCommandParser, ListKeywordsPredicate
and LogicManager, which implements the Logic interface. LogicManager holds a AddressBookParser that parses the
user input, and a model where the command is executed. Additionally, it implements the following operations:
-
LogicManager#execute(String)— Executes the given user String input to return aCommandResultobject.
These operations are exposed in the UI interface as MainWindow#executeCommand(String).
Given below is an example usage scenario and how the filter by tags and/or ward mechanism behaves at each step.
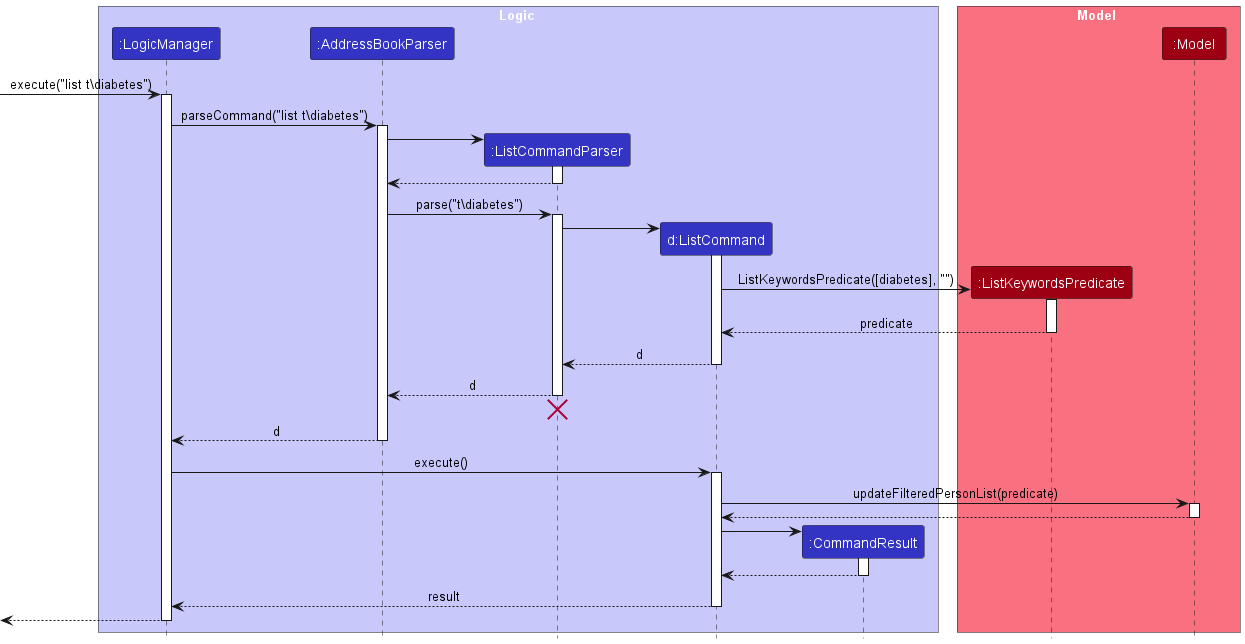
Step 1. The user executes list t\diabetes command to list patients with the diabetes tag in the address book.
- The
listcommand triggersAddressBookParserto parse the user input, identifying thelistcommand word to callListCommandParser#parse(String)to parse the rest of the user input.
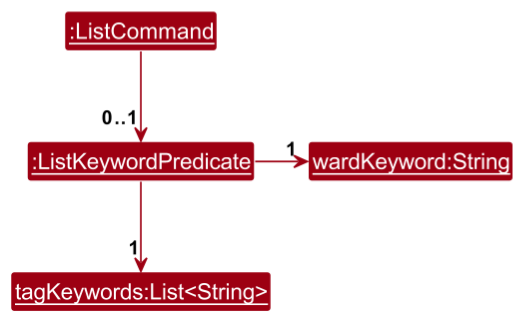
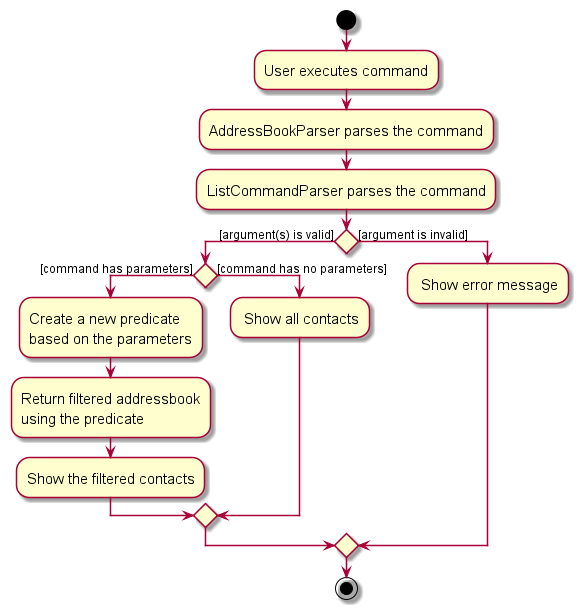
Step 2. ListCommandParser#parse(String) parses the user input. If there are subsequent arguments, a
ListKeywordPredicate object is created with the keyword(s) provided. The keywords can be either a ward or tag(s) or both,
supplied by the user with the relevant prefix. In this case, it would be a tag, t\diabetes.
Step 3. A new ListCommand instance is created using the ListKeywordsPredicate object. (If there are no parameters
provided, it will still simply create a ListCommand object.)
The following is a list of objects created thus far:
Step 4. The ListCommand object is returned to LogicManager and execute is called. ListCommand#execute(Model)
filters the list of patients in Model based on the ListKeywordsPredicate object if it is present. (Otherwise, it
returns the full list of patients.)
Step 5. The filtered list of patients (with diabetes) is displayed to the user through the GUI.
UML Diagrams:
The following sequence diagram shows how the listing of relevant patients would work:
The following activity diagram summarizes what happens when a user executes a new command to list relevant patients:
Design considerations
Aspect: Command to filter:
-
Alternative 1 (current choice): Add the parameters to list command instead of find.
- Pros: More appropriate as
listwill produce a useful list of relevant contacts, whereasfindimplies that only one useful result is expected. - Cons: May not have such a clear distinction between
listandfind, as user just wants to search for results.
- Pros: More appropriate as
-
Alternative 2: Add parameters to find command instead of list.
- Pros: Easy to use, one command will perform all search.
- Cons: Unable to differentiate usefulness.
Aspect: Filter by a ward or many wards:
-
Alternative 1 (current choice): Allow filtering only by at most 1 ward input.
- Pros: More targeted; Nurses will only refer to the ward that they are in or are visiting. Otherwise, will filter across all wards.
- Cons: Does not allow looking at specific, multiple wards.
-
Alternative 2: Allow multiple ward tags.
- Pros: Easy to be more specific.
- Cons: Not relevant for the nurses use case. Allowing more wards also make it harder to filter fast.
Find a patient by name or NRIC/FIN
Implementation
The find feature is facilitated by FindCommand, FindCommandParser, NameContainsKeywordsPredicate and
IcContainsKeywordsPredicate.
Given below is an example usage scenario and how the find by name or IC mechanism behaves at each step.
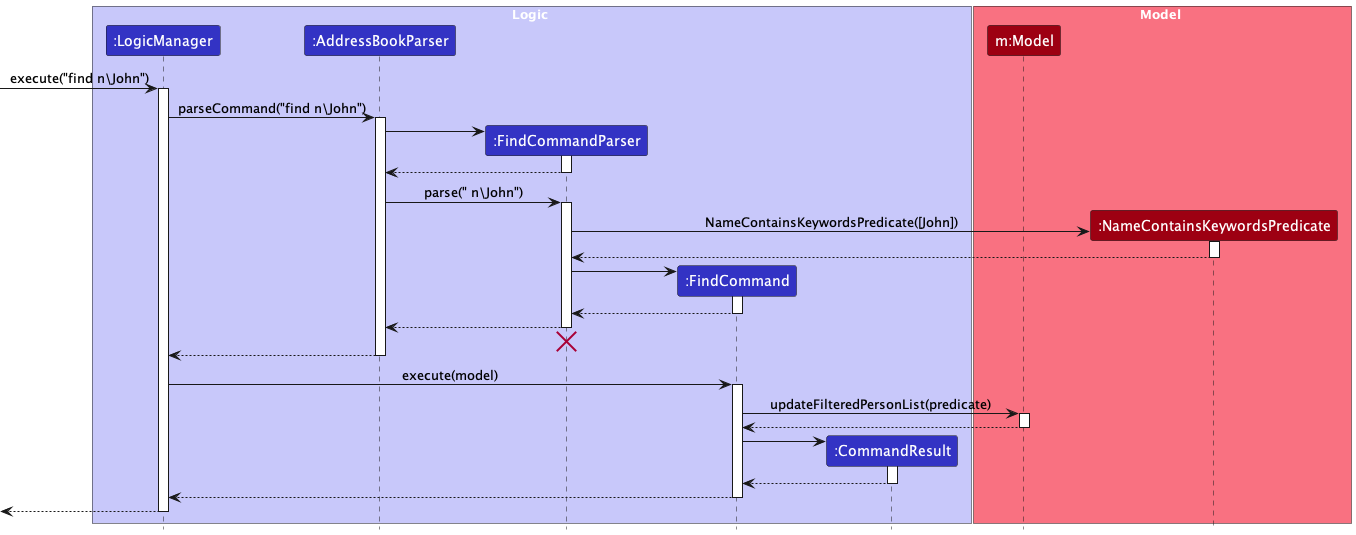
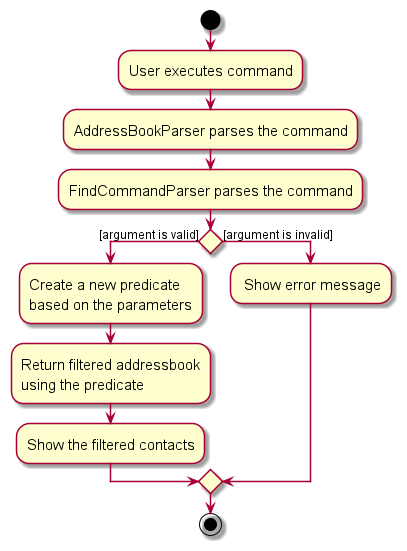
Step 1. The user executes find n\Bob command to find patient with the name Bob in the address book. The
FindCommandParser parses the user input, creating a new FindCommand and NameContainsKeywordsPredicate object.
Step 2. For each patient in the address book, the predicate object will be passed to
Model#updateFilteredPersonList check if the patient has Bob as part of his/her name. If the patient has the name Bob,
the patient will be shown in result.
UML Diagrams:
The following sequence diagram shows how the finding of patient would work:
The following activity diagram summarizes what happens when a user executes a new command to find a patient:
Design considerations:
Aspect: Find by full word or letters:
-
Alternative 1 (current choice): Allow finding by full word only.
- Pros: More meaningful to find by words instead of just letters.
- Cons: Harder to search when patient details is insufficient.
-
Alternative 2: Allow finding by letters.
- Pros: Able to search even if lacking patient information.
- Cons: Harder to get specific patient as result will be a list.
Documentation, logging, testing, configuration, dev-ops
Appendix
Appendix: Requirements
Product scope
Target user profile: Ward nurses
- Manage a significant number of patient contacts with varying details
- Quickly access critical patient information in time-sensitive situations
- Track and log details of care administered to each patient over time
Preferences/Skills
- Prefer desktop apps over other types
- Can type fast
- Prefers typing to mouse interactions
- Is reasonably comfortable using CLI (command-line interface) apps
Value proposition: streamlined text-based commands to manage contacts faster than a typical mouse/GUI driven app
User stories
Priorities: High (must have) - * * *, Medium (nice to have) - * *, Low (unlikely to have) - *
| Priority | As a … | I want to … | So that I can… |
|---|---|---|---|
* * * |
user | add patient records | keep track of their medical condition in the hospital |
* * * |
user | view existing patient records | access information on existing patients |
* * * |
user | delete a patient record | remove outdated or irrelevant patient data |
* * |
user | edit patient records | ensure that all patient details are current and accurate |
* * |
user | list patients based on their tags | view patients based on category |
* * |
user | list all patients tied to a specific ward | know which patients belong to which ward |
* * |
user | find patients via their name or NRIC/FIN | quickly find information of specific patient |
* * |
user | access the user guide through the app easily | learn how to use the NAB |
* |
user | view patient list sorted by name | look through the list of patients in a more organized manner |
Use cases
(For all use cases below, the System is the NAB and the Actor is the user, unless
specified otherwise)
Use case: UC01 - View all patient records
MSS
- User requests to list patients.
-
NAB shows a list of patients.
Use case ends.
Extensions
- 1a. NAB detects that the command is invalid.
- 1a1. NAB shows an error message.
Use case ends.
Use case: UC02 - Add a patient
MSS
- User requests to add a patient.
- NAB adds the patient.
-
NAB shows success message to the user.
Use case ends.
Extensions
- 1a. NAB detects that the patient details is invalid.
- 1a1. NAB shows an error message.
Use case ends.
Use case: UC03 - Delete a patient
MSS
- User requests to view patient records(UC01).
- User requests to delete a patient in the list.
- NAB deletes the person.
-
NAB shows success message to the user.
Use case ends.
Extensions
- 2a. The given index is invalid.
- 2a2. NAB shows an error message.
Use case ends.
Use case: UC04 - Edit a patient's records
MSS
- User requests to view patient records(UC01).
- User requests to edit a patient’s record in the list.
- NAB edits the patient’s record.
-
NAB shows success message to the user.
Use case ends.
Extensions
- 2a. NAB detects that the patient details is invalid.
- 2a1. NAB shows an error message.
Use case ends.
Use case: UC05 - Find patient by name
MSS
- User requests to find a patient in the list with specific name.
-
NAB shows the patient.
Use case ends.
Extensions
- 1a. NAB detects that the given parameter is invalid.
- 1a1. NAB shows an error message.
- 1b. No patient with specified name is present in the NAB.
- 1b1. NAB displays an empty list.
Use case ends.
Use case: UC06 - Find patient by NRIC/FIN
MSS
- User requests to find a patient in the list with specific NRIC/FIN.
-
NAB shows the patient.
Use case ends.
Extensions
- 1a. NAB detects that the given parameter is invalid.
- 1a1. NAB shows an error message.
- 1b. No patient with specified NRIC/FIN is present in the NAB.
- 1b1. NAB displays an empty list.
Use case ends.
Use case: UC07 - View patient with specific tags
MSS
- User requests to view patients with specific tags.
-
NAB shows the patient list.
Use case ends.
Extensions
- 1a. NAB detects that the given parameter is invalid.
- 1a1. NAB shows an error message.
- 1b. No patient with the specified tags are found in NAB.
- 1b1. NAB displays an empty list.
Use case ends.
Use case: UC08 - View patients in specific ward
MSS
- User requests to view patients in specific ward.
-
NAB shows the patient.
Use case ends.
Extensions
- 1a. NAB detects that the given parameter is invalid.
- 1a1. NAB shows an error message.
- 1b. No patient with specified ward is present in the NAB.
- 1b1. NAB displays an empty list.
Use case ends.
Use case: UC09 - Get help with command usage
MSS
- User requests to get help with command usage.
-
NAB shows command usage.
Use case ends.
Extensions
- 1a. NAB detects that the command is invalid.
- 1a1. NAB shows an error message.
Use case ends.
Non-Functional Requirements
- Should work on any mainstream OS as long as it has Java
11installed. - A user with above average typing speed for regular English text (i.e. not code, not system admin commands) should be able to accomplish most of the tasks faster using commands than using the mouse.
- The codebase should be well-structured and well-documented to facilitate future maintenance and enhancements.
- The application should only support a single user.
- The data should be stored locally and should be in a human editable text file.
- The software should work without requiring an installer.
- The software should not depend on any specific remote server.
- The product should be available as a single JAR file of size 100MB or below.
- The product should process a user input command within 2 seconds.
Appendix: Instructions for manual testing
Given below are instructions to test the app manually.
Launch and shutdown
-
Initial launch
- Download the jar file and copy into an empty folder
- Double-click the jar file
Expected: Shows the GUI with a set of sample contacts. The window size may not be optimum.
-
Saving window preferences
- Resize the window to an optimum size. Move the window to a different location. Close the window.
- Re-launch the app by double-clicking the jar file.
Expected: The most recent window size and location is retained.
Adding a patient
-
Adding a patient
-
Prerequisites: There exists no patient with NRIC/FIN
A1234567Bin the patient records. -
Test case (Valid parameters):
add n\John Smith ic\A1234567B dob\01/01/2000 ad\02/02/2020 w\a1 t\diarrhea
r\likes to go to the park
Expected: Patient successfully added into patient list. Details of the added patient shown in the status bar. -
Test case (Missing parameter):
add n\John Smith
Expected: No patient is added. Error details shown in the status bar. -
Test case (Invalid Name):
add n\ ic\A1234567B dob\01/01/2000 ad\02/02/2020 w\a1 t\diarrhea r\likes to go to the park
Expected: Similar to previous. -
Test case (Invalid NRIC/FIN):
add n\John Smith ic\A12347B dob\01/01/2000 ad\02/02/2020 w\a1 t\diarrhea r\likes to go to the park
Expected: Similar to previous. -
Test case (Invalid Date of Birth):
add n\John Smith ic\A1234567B dob\2000 ad\02/02/2020 w\a1 t\diarrhea r\likes to go to the park
Expected: Similar to previous. -
Test case (Repeated Parameter):
add n\John Smith ic\A1234567B ic\A1234567B dob\01/01/2000 ad\02/02/2020 w\a1
t\diarrhea r\likes to go to the park
Expected: Similar to previous. -
Test case (Date of Birth after Admission Date):
add n\John Smith ic\A1234567B dob\03/03/2000 ad\01/01/1999 w\a1
Expected: Similar to previous.
-
Viewing patients
-
Viewing all patients
-
Prerequisites: Multiple patients in the patient list.
-
Test case:
list
Expected: List of patients is shown. -
Test case:
list 181or any command with extra characters supplied
Expected: No change in displayed patient list. Error details shown in the status message.
-
-
Viewing patients by tags and ward
-
Prerequisites: Multiple patients in the patient list.
-
Test case:
list tag\diarrhea w\a1
Expected: List of patients is shown. -
Test case:
list t\diarrhea
Expected: List of patients is shown. -
Test case:
list w\a1
Expected: List of patients is shown.
-
Editing a patient
-
Edit a patient while all patients are being shown
-
Prerequisites: List all patients using the
listcommand. Multiple patients in the list. -
Test case:
edit 1 n\John
Expected: Name of first patient is changed. Details of the edited patient is shown in the status bar. -
Test case:
edit 1 ic\W9876543M
Expected: NRIC/FIN of first patient is changed. Details of the edited patient is shown in the status bar. -
Test case:
edit 1 dob\03/03/2005
Expected: Date of birth of first patient is changed. Details of the edited patient is shown in the status bar. -
Test case:
edit 1 ad\05/05/2021
Expected: Admission date of first patient is changed. Details of the edited patient is shown in the status bar. -
Test case:
edit 1 t\flu r\afraid of darkness
Expected: tag and remark of first patient is changed. Details of the edited patient is shown in the status bar. -
Test case (Invalid Index):
edit x n\Johnwhere x is larger than list size
Expected: Error details shown in status bar. -
Test case (Invalid Name):
edit 1 n\
Expected: Patient name is not changed. Error details shown in the status bar. -
Test case (Invalid NRIC/FIN):
edit 1 ic\a1231234b
Expected: Patient NRIC/FIN is not changed. Error details shown in the status bar. -
Test case (Invalid Date of Birth):
edit 1 dob\03-03-2004
Expected: Patient Date of Birth is not changed. Error details shown in the status bar. -
Test case (Invalid Admission Date):
edit 1 ad\04-02-2024
Expected: Patient Admission Date is not changed. Error details shown in the status bar. -
Test case (Date of Birth after Admission Date):
edit 1 dob\03/03/2024 ad\01/01/2024
Expected: Patient Date of Birth and Admission Date is not changed. Error details shown in the status bar. -
Test case (Invalid Ward):
edit 1 w\B-1
Expected: Patient ward is not changed. Error details shown in the status bar.
-
Finding a patient
-
Finding a patient by name
-
Prerequisites: There exist only 1 patient
John Smithin the patient records. -
Test case:
find n\John Smith
Expected:John Smithis shown. -
Test case:
find n\john
Expected: Similar to previous. -
Test case:
find n\Smith
Expected: Similar to previous. -
Test case:
find n\j
Expected: No patient is shown. -
Test case:
find n\
Expected: Similar to previous.
-
-
Finding a patient by NRIC/FIN
-
Prerequisites: There exist a patient with the NRIC/FIN
A1234567Bin the address book. -
Test case:
find ic\A1234567
Expected: The patient with the NRIC/FINA1234567Bis shown. -
Test case:
find ic\a1234567b
Expected: Similar to previous. -
Test case:
find ic\
Expected: No patient is shown.
-
Deleting a person
-
Deleting a patient while all patients are being shown
-
Prerequisites: List all patients using the
listcommand. Multiple patients in the list. -
Test case:
delete 1
Expected: First patient is deleted from the list. Details of the deleted contact shown in the status message. -
Test case:
delete 0
Expected: No patient is deleted. Error details shown in the status message. -
Other incorrect delete commands to try:
delete,delete x,...(where x is larger than the list size)
Expected: Similar to previous.
-
Saving data
-
Dealing with missing/corrupted data files
-
Prerequisites: The addressbook.json file in the data directory must exist.
-
Test case: Delete the addressbook.json file.
Expected: The app launches successfully, populated with the sample data.
-
Appendix: Planned Enhancements
Team size: 5
1. Checking if a date is valid:
Currently, the app performs some form of date validation in terms of the syntax of the date. For the day, month and
year, the range is also limited to within reasonable calendar days (i.e. up till 31), months (i.e. up till 12) and
years (i.e. up till 9999). The entire date itself must also be up till the current date. However, the app does not
check if the date is valid. For example, a nurse could key in 30/02/2022 (reasonable range for each date segment
and before current date) as the date of birth of a patient.
For more accurate error checking, we plan to perform more concrete validation of the dates to check if the date exists. This is done by checking if the input date is a valid date as a whole (not just its parts), and throwing the error that the date does not exist if it is invalid.
2. Standardise patient look-up/ accessing with the NRIC/FIN:
Currently, the app does not allow users to edit or delete a patient’s details by their NRIC/FIN number. As patients
will predominantly (except foreigners) have a unique NRIC/FIN number, it would be more intuitive for nurses to be able
to edit and delete with an NRIC/FIN parameter as well, switching to INDEX should the patient not have an NRIC/FIN.
3. Editing of patient details: Currently, the app does not directly edit patient contact details from the patient list. Some patient entries (or details) may be accidentally deleted. For example, when editing the tags field, all tags will be overwritten. This may result in key information being lost.
We plan to allow nurses to view the corresponding patient’s details while editing. This can be done by having the nurse
first input only edit INDEX (as per the original command). The app will then show the patient’s details.
Subsequently, the nurse will be able to edit specific field(s) of the patient’s details with a follow-up command,
while referencing the patient data.
This approach will reduce accidental deletion of critical details.
4. Support for tourist patients: Currently, the app only allows for adding patients who are Singaporeans/Permanent Residents (via NRIC) or foreigners with Long-Term immigration passes (via FIN). However, healthcare professionals also need to manage records for tourist patients who are receiving medical services during their visit to Singapore.
We plan to enhance the app by introducing a new “Passport” field that can be used to store passport numbers of tourist patients for identification purposes. This will ensure that the app can comprehensively manage patient records for all individuals, including tourists, without limiting it to just those with NRICs or FINs.
The implementation will involve modifying the existing add/edit commands to accept a Passport parameter in addition
to the current NRIC and FIN parameters. At least one of these three identification fields (NRIC, FIN, or Passport)
must be provided when adding or editing a patient’s record. This approach will seamlessly integrate tourist patient
support into the existing workflow and data model.
Appendix: Glossary
| Term | Further Explanation, Representation and Examples |
|---|---|
| CLI | Command Line Interface. It is a text-based interface where you input commands to interact with the system. e.g., the command terminal. Perfect for fast typists like you! |
| Command | An instruction given to the application to perform a specific task. e.g., add, list, delete. |
| Command Terminal | A text-based interface where you can input commands to interact with the computer’s operating system. e.g., cmd for Windows users. |
| Data File | A file that stores the data of the application. e.g., addressbook.json. |
| FIN | Foreign Identification Number. It is a unique identifier for foreigners with Long-Term immigration passes in Singapore. e.g., G1234567P. |
| GUI | Graphical User Interface. It is the visual representation of the system you see. e.g., Windows Desktop, Chrome Browser. |
| JSON | JavaScript Object Notation. It is a data file type. For e.g., to store contacts saved in NAB. |
| Mainstream OS | Windows, Linux, Unix, MacOS. The most commonly used operating systems. |
| NRIC | Identity card number of the National Registration Identity Card. It is a unique identifier for individuals in Singapore. e.g., S1234567A. |
| Parameter | A value that is passed to a command to perform a specific task. e.g., n\John Doe, ic\T1234567P. |
| Person/Patient | A contact entry in NAB, who is receiving medical services. |
| Prefix | A string of characters that precedes a parameter to indicate the type of parameter. e.g., n\John Doe, ic\T1234567P. |